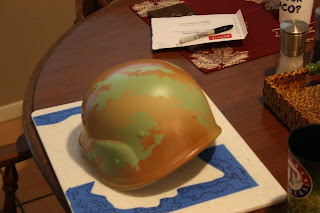
The first thing I need to tell you is that this won't be the project for you if you can't stand tedious work. In the same breath, don't get caught up in perfectionisim. This project takes a little bit of an artistic eye. The key is attention to detail- things like avoiding sharp corners on your stencils, good feathering technique on the color blending, and making sure everything you don't want painted is masked off. It takes quite a bit of time, but the results are worth it. Let's get to it!
Materials
- 1 Razor blade (the kind with the breakable sections, you'll go through a few of them)
- Cutting board
- 1" Blue Painter's Tape
- 2" Blue Painter's Tape
- Permanent Marker
- OCP pattern- either from a large piece of clothing or google "multicam swatch"
Spray Paint (Shown in order of use)
- Primer
- Tan
- Medium-Dark Brown [the brown I used was too red, compared to the actual coloration, but that may actually be better with the reddish tint the earth has in Texas]
- Light Green [my later trials replace the Valspar paint with the olive Rustoleum Camouflage paint for a closer representation of the actual coloration]
- Dark Green
- Dark Brown
- White-Green
- Flat Clear Coat
Step 1
Follow the instructions for preparing the surface you'll be working on. Sand and prime as necessary. Next, apply a solid coat of the tan. You'll want a nice even coat over the entire piece.
Step 2
Add the medium brown next. Try to achieve a 50/50 mix of the two colors and feather the edges of the brown so there is a soft transition between the two colors.
Step 3
Lay out the 2" tape on the cutting board as shown, overlapping the edges by about 1/4 inch. I traced the green patterns on the print out of the swatch with a permanent marker to get a feel for the shapes. Freehand draw your designs on the tape and cut with the razor. Discard the male pattern when done. Your patterns should cover about 1/3 of the overall area. Mask off anything that isn't to be painted, and make sure all the edges of your stencils are firmly secured to the surface to prevent overspray- to mimic the pattern you want crisp edges- although any mistakes made in the first few steps can be covered up later on, but it gets harder as the project continues.
Paint with the light green color and feather in a little bit of dark green in this step, but not much. You can always go back over it with the light green again to soften it up if you overdid it while the stencils are still on.
The result of step 3:
Step 4
Step for is a repeat of step three, but we'll start to add more dark green. The premise of this pattern is volume confusion- meaning the contrasting colors make the object appear distorted- tricking the eye to think it is looking at something other than the object you're trying to conceal. This step is probably one of the most challenging parts of the whole project so take your time.
Cover another 40% of the part with large splotches, overlap them slightly with the previous light green spots.
Before you apply the paint, use the permanent marker to shade the tape in areas where the light green comes through. you'll want to apply dark green here later, but if you don't mark it now there's no way to tell where those spots are later and you'll wind up with big blobs.
Retouch the areas with marker that got sprayed over to make them more visible. Add both male and female stencils to the blotches. Male to areas that will be dark, and female to areas that will remain light green. These help provide the green spots seen in the pattern.
Result of step 4:
Step 5
Next you'll add the dark blotches. Until now, i've been guessing at most of the stencil designs. Here though I wanted to get the right spacing and concentration of the dark and light splotches so I more closely copied the pattern. Unfortunately, I was excited about finishing and didn't take as many pictures. Like in all the previous steps, make sure the entire object is masked off save for the portion being painted. The last two steps are just like step three, only with smaller patterns and different colors.
The result of step 5:
Step 6:
Repeat step 5 with white splotches.
The result of step 6:
Step 7:
Add a the flat clear coat to take the shine off and to keep the paint from scratching or chipping. As you can see below the paint scheme does a great job of blending in with the surroundings. Eventually I'd like to put this pattern on my AR-15 using a much more durable product know as DuraCoat, but before I try that I wanted to get the spray paint version down. I'm satisfied wit the results and still have plenty of paint left. Now to find some more things to paint...
And there you have it! MultiCam camo from a rattle can.
Here's another great tutorial in case you're stuck.
You may also like:
![[callsign]KTF](https://blogger.googleusercontent.com/img/b/R29vZ2xl/AVvXsEijMMR114qyiQBvDsYOUVp-O4p4xyZYDk6LmAPpRNd963-eDfc7UykxXJ6OyiLVXgiIkB6NFGG-BHVBqSi6ghWNtbzI7YjG6HAm5hOszKl0JKcZTOdn6Bl5Mhms_nwBk2nDvL3jNTRq4r-0/s1600/KTF+Banner-Mountain.jpg)


No comments:
Post a Comment